NoICE for the Motorola/Freescale 68HC12 can be used with a serial monitor, like the other versions of NoICE. However, the 68HC12 chip includes a feature called Background Debug Mode, or BDM. Most 68HC12 evaluation boards and single board computers include a BDM port, usually using a 6-pin connector.
NoICE support for BDM is contained in an optional DLL (NComBDM.dll or NComCOMPOD.dll). Some BDM pods also require the installation of a vendor-provided driver. Currently supported are
Additional pods may be supported in the future. Contact us if you need support for a particular pod not listed here.
In addition to this document, you may wish to read the NoICE HC12 Tutorial at https://www.noicedebugger.com/tour. It contains step-by-step examples of configuring and using NoICE for HC12.
More information is available here on
Before you can use NoICE with your BDM pod, you may need to install the appropriate driver.
If your pod uses a serial interface (Elektronikladen, Ross, or D-Bug12), no driver is required besides the standard Windows serial driver.
For other pods, you should install the driver that came with the pod, or visit the vendor's web site to get the most recent driver. This is especially true if you are running Windows Vista, which tends to hate any driver older than a week and a half...
Follow the manufacturer's instructions for connecting and using your pod. In most cases, you will need to proceed in this order:
Once you have set up the BDM pod, you will not need to repeat the last four steps on subsequent runs.
To disconnect the BDM pod from the target, you will need to
Failure to follow the manufacturer's instructions for connecting and disconnecting may result in damage to the BDM pod or to your target.
This section describes the common items in the BDM configuration dialogs. Pod-specific information may be found below.
Your hardware must be set to come up in Special Single Chip mode. This is necessary so that BDM is active immediately after reset. If you start up in any other mode, your target will begin running whatever the reset vector points at. If this is not a very polite program, BDM will proably not be able to gain control of the target.
If you wish NoICE to access off-chip memory (typically to download code into it), you must change to another mode, and perhaps set up chip select outputs etc. The best way to perform such mode setting and initialization is to use the Play after Reset edit box to specify a command file to play when communications is initialized and after each reset. This is described further under Initializing the Target. You may use the Browse button to select the file.
Use the Target Chip/Environment list to select your target processor. Please be careful to select the exact chip that you are using. For example, the DG60 and DG60A use very different algorithms for programming Flash. Use of the incorrect algorithm may damage the chip. If you can't find an appropriate type, please contact the Author. "Generic 68HC12" is safe in all cases, but will not allow you to burn Flash, use paged memory (PPAGE), or use hardware breakpoints.
Once you select a target, the Paged Memory, Hardware Breakpoint and Use Flash Burner checkboxes will be enabled if the selected target supports these features.
Note: Flash burning is not supported when using the Axiom BDM pod.
The Bus Frequency (MHz) combo box specifies the target bus frequency. This is one half of the crystal frequency. On some pods, this value may not be changable.
This field is a combo box: if the frequency you want isn't in the drop-list, just type the value. However, some BDM pods may not support arbitrary frequencies. Consult the documentation for your pod to determine its capabilities.
For some targets, Flash burning may only be supported at a single frequency (usually 8 MHz).
Elektronikladen has manufactured several generations of ComPOD, a BDM pod with an RS-232 interface. NoICE will work with any of them, using the standard Windows serial driver.
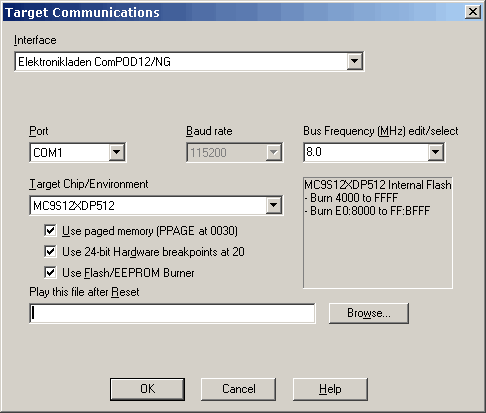
Click on a field for more information about its function.
Select an available serial port from the Port drop list. The baud rate for the pod is fixed at 38,400 for the original ComPOD12, and 115,200 for the ComPOD12/Pro and ComPOD12/NG.
The Bus Frequency (MHz) combo box specifies the target bus frequency. This is one half of the crystal frequency. The original ComPOD12 supports only 8 MHz. The ComPOD12/Pro can support target bus frequencies of 1, 2, 4, or 8 MHz. The ComPOD12/NG can support any target frequency in the range 0.25 to 40 MHz.
This field is a combo box: if the frequency you want isn't in the drop-list, just type the value.
For some targets, Flash burning may only be supported at a single frequency (usually 8 MHz).
Please read additional information about configuration
P&E has manufactured a wide variety of BDM pods, including their original parallel-port CABLE12, several generations of USB Multilink, and a number of more complex devices. To use any of these pods, you must install the appropriate driver from P&E.
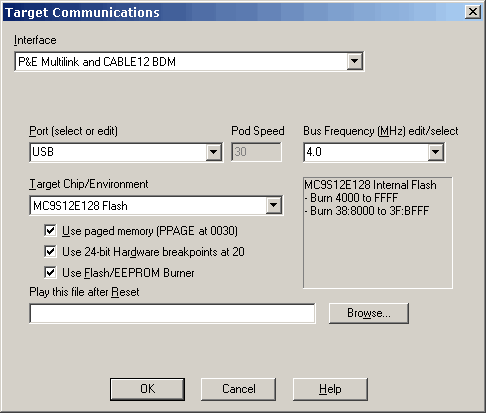
Click on a field for more information about its function.
Select the appropriate port from the Port combo box. If you are using the USB Multilink, select "USB". Otherwise, select the parallel port to which your BDM is connected. The BDM interface actually uses port addresses rather than LPTn numbers, so the addresses traditionally used by parallel ports are shown. When in doubt, go with the address, not the LPT number.
If you are unsure of the address of your parallel port, run the Windows Control Panel. Double-click on "System", and select the "Device Manager" tab. Expand the item labeled "Ports (COM and LPT)". Select your port, and press the "Properties" button. Select the "Resources" tab. The "Input/Output Range" specifies your port's address.
If your parallel port's address doesn't match one of the selections in the Port list, you can enter the port's address in hex. NoICE will accept only addresses in the range 0x200 to 0xFFFF. Please be careful: addressing something other than a parallel port may cause your PC to do surprising (and generally undesirable) things!
If you are (still!) running Windows XP and find that you have trouble the first time you run NoICE after booting, but that things work thereafter, please read about disabling Windows port polling
The Pod Speed box shows a speed value used by the BDM pod. When you press "OK" in the dialog, NoICE will determine the proper setting of the speed, and store it in the Registry. This process may take several seconds, so please be patient. On subsequent runs, NoICE will use the setting from the Registry for faster initialization.
If you use a firewall, you may receive a warning when you run NoICE for the first time after selecting a P&E pod. For example, the Windows XP Firewall says
"Windows Firewall has blocked this program from accepting connections from the Internet or a network."
This is because the P&E BDM DLL supports all P&E BDM pods including an Ethernet version (Cyclone). The DLL runs an enumeration process that listens on a TCP port. Since NoICE does not support the Cyclone pod, you can tell your firewall to block access to the port. This should have no effect on NoICE.
Please read additional information about configuration
USBDM is an Open Source project which includes a variety of BDM and JTAG pods, and the drivers and DLLs to interface with them. Hardware may be built from the Open Source documenation, or can be purchased from a variety of vendors.
NoICE operates with version 4.10 and later of USBDM. To use NoICE with USBDM, you must install the appropriate drivers and libraries from the USBDM distribution.
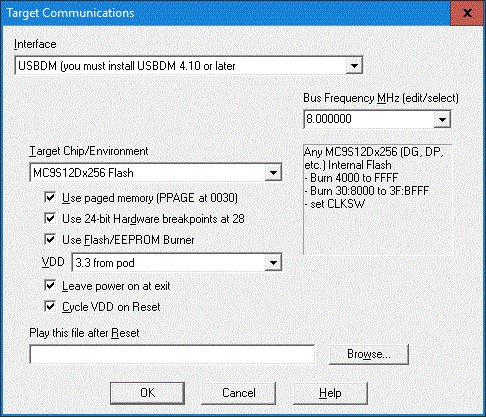
Click on a field for more information about its function.
The Bus Frequency (MHz) combo box must be set to match the speed of the target processor, or BDM will not operate correctly. This is usually one half of the crystal frequency.
Some USBDM pods can provide power to target boards via the BDM connector. Some pods provide a constant voltage, with the value set at 3.3 or 5 volts via jumper or switch. Other pods can turn power on and off under software control. NoICE's USBDM configuration dialog contains three controls to configure such pods. These controls have no effect when used with a USBDM pod that does not have power control.
Please read additional information about configuration
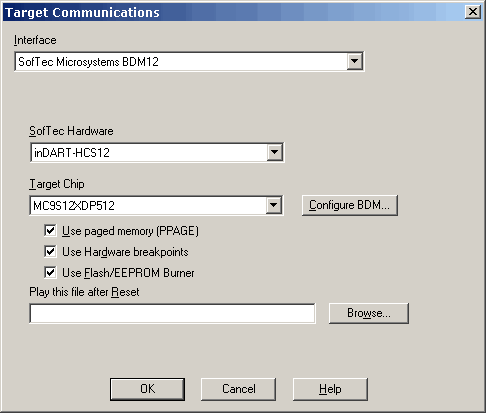
Click on a field for more information about its function.
Select the appropriate hardware device from the SofTec Hardware drop list.
Press Configure BDM... to open a dialog box that controls various settings for the SofTec BDM pod.
NOTE: the SofTec dialog has a checkbox labelled "Do Not Modify EEPROM Contents". In most cases, you will want to check this box. If you don't, then every time you load a program into Flash, the SofTec DLL will erase all of the EEPROM. Really.
Use the Target Chip/Environment list to select your target processor. The SofTec pods support only the MC9S12 family. They do not support non-S HC12 parts.
Please read additional information about configuration
NoICE requires version 4.0.0b17 or later of D-Bug12. NoICE uses the BDMDB commands, and will not work with versions of D-Bug12 that do not contain these commands.
Before using your D-Bug12 pod with NoICE, verify that it works correctly in pod mode with your target. Follow the instructions that come with the pod.
Once pod mode works, use your terminal program and the BAUD command to set the baud rate to be used with NoICE. Typically, this should be 38,400 or faster. The pod stores the baud rate in EEPOM, so you only need to perform this step once.
Exit the terminal program and run NoICE. Select an available serial port from the Port drop list. Select the correct baud rate for your pod from the Baud rate drop list.
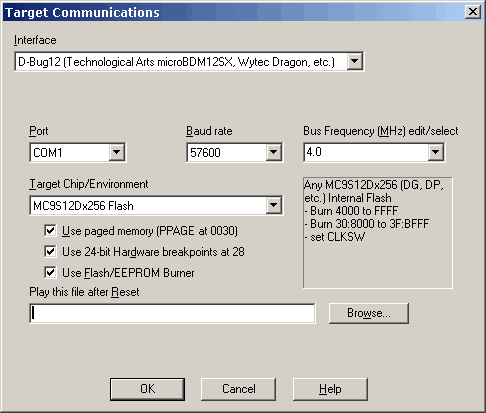
Please read additional information about configuration
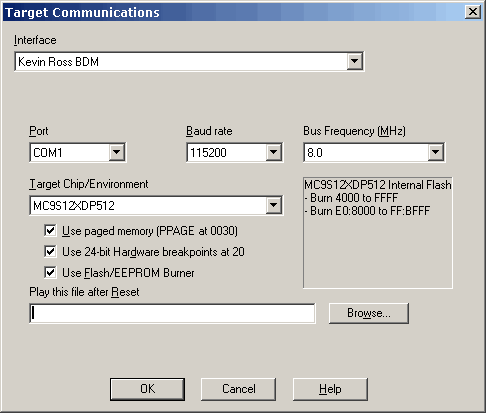
Click on a field for more information about its function.
Select an available serial port from the Port drop list. Select the correct baud rate for your pod from the Baud rate drop list. Pod versions 4.5 and later operate at 115200 baud. Earlier pods may use lower baud rates. Note that the Ross pod uses RTS/CTS handshaking. Your serial cable must include both RTS and CTS.
The Bus Frequency (MHz) combo box must be set to match the speed of the target processor, or BDM will not operate correctly.
Pod versions 4.4 and earlier contain DIP switches that must be set to specify the baud rate and target processor frequency. Later versions of the pod can support target bus frequencies of 1, 2, 4, or 8 MHz. Refer to pod documentation for details.
NoICE does not support the MODA, MODB, RSRV1, or RSRV2 outputs of the Ross pod. You should use the 6-pin BDM connector rather than the 10-pin if your pod has both.
Please read additional information about configuration
TBDML was an Open Source BDM project which included a BDM pod and the drivers and DLLs to interface with it. The TBDML code was later incorporated into the USBDM project, and the TBDML DLL was rewritten as a shim which used the USBDM DLL and drivers. However, distributions of USBDM after about 4.6 seem to no longer include a TBDML DLL.
NoICE supports the TBDML API on a legacy basis, mostly to support customers who have older versions installed. It may be possible to use at least some TBDML pods with USBDM, or to build the TBDML shim (which seems to still be part of the USBDM source tree). However, we cannot assist you in such efforts.
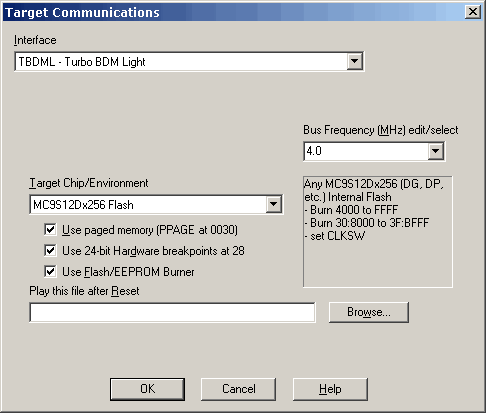
Click on a field for more information about its function.
The Bus Frequency (MHz) combo box must be set to match the speed of the target processor, or BDM will not operate correctly. The TBMDL can support any target frequency in the range 0.9 to 16.5 MHz.
Please read additional information about configuration
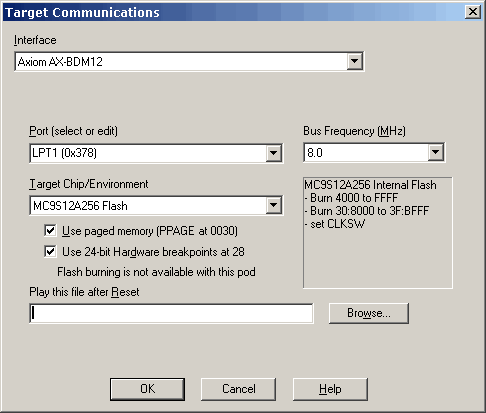
Click on a field for more information about its function.
Select the appropriate port from the Port combo box. The BDM interface actually uses port addresses rather than LPTn numbers, so the addresses traditionally used by parallel ports are shown. When in doubt, go with the address, not the LPT number.
If you are unsure of the address of your parallel port, run the Windows Control Panel. Double-click on "System", and select the "Device Manager" tab. Expand the item labeled "Ports (COM and LPT)". Select your port, and press the "Properties" button. Select the "Resources" tab. The "Input/Output Range" specifies your port's address.
If your parallel port's address doesn't match one of the selections in the Port list, you can enter the port's address in hex. NoICE will accept only addresses in the range 0x200 to 0xFFFF. Please be careful: addressing something other than a parallel port may cause your PC to do surprising (and generally undesirable) things!
If you are running Windows XP and find that you have trouble the first time you run NoICE after booting, but that things work thereafter, please read about disabling Windows port polling
The Bus Frequency (MHz) combo box must be set to match the speed of the target processor, or BDM will not operate correctly. If you are using the older AX-BDM12 rather than the AX-BDM12A, the Bus Frequency must be set to 8 MHz, as the older pod does not support variable frequencies.
Note: Flash burning is not supported when using the AX-BDM12.
Please read additional information about configuration
NoICE serial monitors such as MONHC12.ASM initialize various ports and peripherals when they start up. They must do this in order to communicate with the PC, and the initialization is convenient for the user, who can download and test small programs without worrying about doing initialization. If you want to change the initialization, you can do so by modifying the monitor.
In contrast, the BDM version comes up having performed no initialization other than ensuring that BDM is enabled and active. All other values are as specified by Motorola/Freescale when the 68HC12 comes out of reset in the mode specified by your MODA and MODB pin settings (usually Special Single Chip). In particular
Depending on the configuration of your target hardware, you may need to initialize at least some ports before you can download code. For example, if your download RAM is connected to the CSD output of an HC812A4, you must properly program CSD before downloading.
The best way to perform mode setting and initialization is to place commands in a command file, and specifying the command file for Play after Reset. In most cases, the NoICE EDITcommand will be used in the command file to set the appropriate I/O register values. The Play after Reset file may contain any valid NoICE command. Note, however, that this file is PLAYed before NoICE12.NOI when NoICE12 is started.
As an example, suppose that our target board is the Axiom CMD12A4, which we wish to operate in Special Expanded Wide mode in order to access external memory. The MODA and MODB jumpers on the board are set to reset into Special Single Chip mode. We need to
The following commands would be placed in a file called AxiomCMD12A4.NOI, and the file specified for Play after Reset.
    REM Beginning in Special Single Chip mode,
    REM set 68HC812A4 for Special Wide mode.

    REM Set INITEE to move EEPROM from F000 to 1000
    EDIT 0x12 0x11

    REM Set mode twice: first write is ignored in special modes
    EDIT 0x0B 0x7B
    EDIT 0x0B 0x7B

    REM Write CSCTL0 to enable CSP0, CSD, CS3, CS2, CS1, and CS0
    EDIT 0x3C 0x3F

    REM Write CSCTL1 to enable CSD as 32K
    EDIT 0x3D 0x10

    REM Write CSSTR0 for 1 wait state on CSP0 and CSD
    EDIT 0x3E 0x15

    REM Write CSSTR1 for 3 wait states on CS3-0
    EDIT 0x3F 0xFF

    REM Write MISC for 8 bit access on CS3-0
    EDIT 0x13 0x40

    REM Set the stack pointer to the top of on-chip RAM
    R SP 0xC00
A file called AxiomCMD12A4_BDM.noi containing the above commands may be found in the NoICE\bin directory.
The NoICE\bin directory also contains .NOI files to set operating modes of most current Motorola/Freescale HC12 variants. The files all assume that the hardware starts in Special Single Chip mode. The files will generally not operate correctly if the chip is started in another mode.
"Classic" NoICE assumes that the program you are debugging is in RAM. This permits NoICE to easily download the program, and to set an unlimited number of breakpoints by writing bgnd or swi instructions.
However, providing enough RAM to hold the program is always a problem. Writing to Flash memory is much more complex than writing to RAM, and it is usually not possible to change the value of a single byte without erasing a larger area. Thus, the "classic" model won't work for debugging programs in Flash.
Most of the HC12 family include two hardware breakpoints (some newer chips have three), which NoICE can use instead of bgnd/swi instructions during debugging. This leaves only the problem of getting the program to be debugged into Flash.
NoICE includes code licensed from Elektronikladen that can burn Flash for many members of the HC12 family. Flash burning is available for all supported BDM pods except the Axiom AX-BDM12.
The HCS12 family has a security feature controlled by the contents of the Flash word at address 0xFF0E/0xFF0F. The NoICE Flash burner forces this word to the value 0xFFFE. This disables security. The alternative would be to let you program the bits, and then have BDM be disabled the next time you reset the chip. NoICE is a debugger, not a production Flash burner, so we assume that you want to use BDM to debug your program.
Flash burner operation is as follows
Some of the HC12 burner programs operate only at limited bus frequencies. The MC9S12 burner programs do not have this limiations.
If you need to burn more than one Motorola/Freescale hex file to make a complete program image, please read about EatS9.
Many members of the HC12 and HCS12 families contain phase locked loops that permit the processor to run at speeds faster or slower than the oscillator or crystal.
When the PLL is enabled, BDM communications may continue at the original, crystal-determined rate, or it may change to follow the processor speed. In most cases, it is preferable to have the BDM speed remain unchanged. That way, regardless of what you do to the processor speed via the PLL, debugging via BDM is unaffected. This is the normal default for HC12 and HCS12 chips.
Unfortunately, some types of HCS12 (including the A, Dx, and H) contain a bug, described in Motorola/Freescale errata, that causes BDM to stop working when the PLL is enabled and BDM is operating in the default mode. For such chips, it is necessary to set the CLKSW bit in the BDM status register at startup. Then, when the PLL is enabled and the processor speed changes, NoICE must change the BDM speed to match.
NoICE sets CLKSW if the NoICE12_targets.ini file contains the line
setCLKSW=1
for the target in question. NoICE12_targets.ini specifies this for the affected chips.
In operation, edit NoICE's target communications dialog for the initial bus frequency, which is the crystal frequency divided by two.
When your startup code enables the PLL (or even if you enable it via manual edit from NoICE), NoICE will notice an error in reading the BDM status register, and pop up a dialog asking you to enter or select a new bus frequency. If the rate you enter doesn't result in a correct read of BDM status, the dialog will continue to pop up until you either specify the correct rate, or abort.
This feature is limited to the BDM speeds supported by particular BDM pods:
CAUTION: BDM uses a very simple protocol, and there is no foolproof way to tell what speed a processor is running at. NoICE polls the BDM status register, and looks for a certain bit pattern. Divergence from the expected pattern is taken to mean that the speed has changed. There is, of course, no guarantee that your target running at speed X will not interpret NoICE's read request at speed Y to be a write request or some other nasty thing. In practice, this seems not to occur. However, we recommend that you not use this feature if your target is connected to hardware that might be damaged or cause harm if written to an unexpected value. (Actually, we recommend that you not do any form of debugging on such a system without appropriate safety measures.)
Motorola/Freescale allows you to move or disable RAM, I/O, Flash and just about everything else on the 68HC12. However, if you move the I/O devices, NoICE will be unable to use PPAGE or hardware breakpoints unless you customize your setup.
The Target Type specifies information about chip options, including PPAGE, hardware breakpoints, and RAM and Flash locations. This information is kept in a file called NoICE12_targets.ini in the NoICE\config directory. For the MC9S12DP256, for example, there is text:
    [MC9S12Dx256 Flash]
    partID=0x001A0000
    PPAGE=0x0030
    BRK24=0x0028
    ramstart=0x1000
    start=0x4000
    last=0xffff
    start2=0x0c0000
    last2=0x0fffff
    multifrequencyBurner=1
    setCLKSW=1
    toolfile=tf2_dp256_flash.bin
    remarks=Any MC9S12Dx256 (DG, DP, etc.) Internal Flash
As an example, suppose that we want to move the I/O registers from the default location of 0x0000 to 0x3000, and move the RAM from the default location of 0x1000 to 0x0000. We proceed as follows:
    [MC9S12Dx256 Flash - I/O at 3000]
    partID=0x301A0000

    PPAGE=0x3030
    BRK24=0x3028
    ramstart=0x1000
    start=0x4000
    last=0xffff
    start2=0x0c0000
    last2=0x0fffff
    multifrequencyBurner=1
    setCLKSW=1
    toolfile=tf2_dp256_flash.bin
    remarks=My HC912D60A board with I/O moved to 3000
This tells NoICE that PPAGE at 3030, the breakpoint module at 3028, and PartID at 301A, rather than at the standard addresses.
Do not change the ramstart value, even if you actually plan to move the RAM! Unlike BRK24 and PPAGE, ramstart is used only during Flash burning, and it must reflect the RAM location immediately after hardware reset or burning will fail.
    ECHO Beginning in Special Single Chip mode after reset,
    ECHO Set INITRG to move I/O to address 3000
    EDIT 0x11 0x30
    ECHO Set INITRM to move RAM to address 0000 (remember - I/O has moved to 3xxx)
    EDIT 0x3010 0x00
INITRG  EQU     $3011   ;where INITRG will be after being moved
RESET:  LDAA    #$10
        STAA    $0011   ;where INITRG is immediately after reset
   ...
When your program runs without NoICE, these instructions will set the address or the I/O registers.
These instructions are not strictly necessary during debugging - in that case, NoICE's Play After Reset file will have already moved the I/O registers before the instruction executes. However, there is no harm in writing to address $0011 after INITRG has been moved - the write will not affect INITRG, but will go instead to the RAM that is now at address 0011. Thus, we recommend that you insert the instructions even during debugging, lest you forget to add them in your final program.
This is somewhat involved, but please take the time to understand clearly how this works:
RESET:  LDAA    #$10
        STAA    $0011   ;where INITRG is immediately after reset
                        ;during debug, this is actually RAM - no problem
        LDAA    #0
        STAA    $3010   ;debug or not, this is I/O
Theoretically, a parallel-port pod ought to be able to run faster than a serial-port pod. In practice, Windows adds overhead to parallel port access that may lessen the performance difference. And clever design can overlap some delays and result in good performance even on an old-fashioned serial link.
We ran simple time trials on a 2 GHz PC running Windows XP, loading, saving and burning 32K of target memory in a hex file. Target running at 8 MHz (16 MHz crystal). Your results may vary depending on PC, operating system, and changes made by the vendors to pod software.
| Vendor | Interface | Load 32K (seconds) | Save 32K (seconds) | Burn 32K to DP256 (seconds) |
|---|---|---|---|---|
| Elektronikladen ComPOD12 NG | 115,200 baud | 4.2 | 3.9 | 14.8 |
| P&E Multilink (parallel) | parallel | 2.8 | 3.5 | 19.7 |
| P&E CABLE12 | parallel | 3.7 | 4.1 | not tested |
| P&E USB Multilink Rev B (current) | USB | 4.2 | 3.5 | 21.6 |
| P&E USB Multilink Rev A (old) | USB | 5.5 | 5.2 | 50.8 |
| Elektronikladen ComPOD12 PRO | 115,200 baud | 8.5 | 5.7 | 35.0 |
| Kevin Ross BDM12 | 115,200 baud | 10.9 | 7.5 | 27.3 |
| TBDML | USB | 10.3 | 12.3 | 43.1 |
| Elektronikladen ComPOD12 | 38,400 baud | 12.3 | 12.9 | 37.0 |
| SofTec inDART-HCS12 | USB | 12.3 | 10.2 | 68.8 |
| D-Bug12 (Technological Arts microBDM12SX) | 57,600 baud | 62.9 | 84.4 | 182.1 |
| SofTec PK-HCS12 | USB | 66.8 | 65.4 | 265.6 |
| Kevin Ross BDM12 via USB-serial converter | 115,200 baud | not tested | 71.1 | not tested |
The factor of ten slowdown on the Ross pod when used with a USB-serial converter is presumably because the Ross pod does an RTS/CTS toggle on every byte and the USB converter does a less than stellar job here. Your results with other brands of converter may vary. The other serial BDM pods show the same speed with the USB converter as with a "real" serial port.
The relatively slow speed of the D-Bug12 is due to the ASCII hex protocol used, as compared to the binary protocol used by the other pods.
NoICE with BDM12 allows an advanced feature called "Virtual UART". This allows the target to use the BDM port to communicate with the Output Window as with a dumb terminal.
Characters in the range 0 to 255 decimal are allowed, and will be displayed using the current Windows character set.
If keyboard focus is in the Output window and the user presses any key other than a function or cursor key while the target is executing, the ASCII/Windows representation of the key will be sent to the target via the serial port.
The Virtual UART requires two consecutive dedicated RAM locations, one for output, and one for input. Both the target and NoICE/BDM read and write the memory locations to implement a communications channel.
To begin using the Virtual UART, the target must clear both memory locations to zero. Whenever the target is running, NoICE polls both bytes.
In order to send a byte to the Output Window, the target simply writes to the first, "output", memory byte. When NoICE sees a non-zero value in the output byte, it displays that value in the Output Window, and then clears the output byte. The target must not write to the output byte unless it is zero, or characters will be lost.
When the user presses a key while the focus is in the Output Window, NoICE will write the key value to the second, "input", memory byte. When the target sees a non-zero value in the input byte, it returns that value as if from a UART, and clears the input byte. NoICE will not write a keyhit to the input byte unless it is zero.
To define the memory locations to be used, edit the BDM configuration file noice12_targets.ini in the NoICE\config directory. For the MC9S12DP256, for example, there is text:
    [MC9S12Dx256 Flash]
    partID=0x001A0000
    PPAGE=0x0030
    BRK24=0x0028
    ramstart=0x1000
    start=0x4000
    last=0xffff
    start2=0x0c0000
    last2=0x0fffff
    multifrequencyBurner=1
    setCLKSW=1
    toolfile=tf2_dp256_flash.bin
    remarks=Any MC9S12Dx256 (DG, DP, etc.) Internal Flash
The memory locations to be used must not be used by your program for any other purpose. This may require you to change your linker file to avoid these bytes, or to define them in your program, as shown below.
The DP256 has RAM from 0x1000 to 0x3FFF. To define a Virtual UART at address 0x1000, we insert the line
virtualUART_address=0x1000into the ini file. It is a good idea to copy the section and give it a name that shows what you are doing. This can prevent confusion later, should you have another DP256 project on which you don't want to use the Virtual UART. In our example, we add
    [MC9S12DP256 Flash with Virtual UART at 0x1000]
    partID=0x001A0000
    PPAGE=0x0030
    BRK24=0x0028
    ramstart=0x1000
    start=0x4000
    last=0xffff
    start2=0x0c0000
    last2=0x0fffff
    multifrequencyBurner=1
    setCLKSW=1
    toolfile=tf2_dp256_flash.bin
    virtualUART_address=0x1000
    remarks=Any MC9S12DP256 with Virtual UART at address x01000
The target code required to use the Virtual UART is similar to any polled UART code. The major difference is that instead of testing a status bit in a status register, the target tests the zero/non-zero value of an entire byte.
Here is an example, done using ImageCraft ICC12 showing how to declare and initialize the Virtual UART
    /* Location MUST match NoICE configuration */
    #pragma abs_address 0x1000
    char VUART_TX, VUART_RX;
    #pragma end_abs_address

    void main(void)
    {
       /* Initialize the Virtual UART */
       VUART_TX = 0;
       VUART_RX = 0;

       etc.
    }
To connect the Virtual UART to printf, you must replace ImageCraft's putchar function with this:
    int putchar (char c)
    {
       if (c == '\n')
          putchar('\r');

       while (VUART_TX != 0)
       {
       }

       VUART_TX = c;
       return c;
    }
CAUTION: if you run your program without NoICE, this version of putchar will hang after sending the first byte, since NoICE won't clear VUART_TX. The solution is usually to use a different version of putchar for release versus debug.
To use the Virtual UART for input, you must replace ImageCraft's getchar function with this:
    int getchar (void)
    {
       int retval;
       while (VUART_RX != 0)
       {
       }

       retval = VUART_RX;
       VUART_RX = 0;
       return retval;
    }
Assembly code is similar:
    VUART_TX equ $1000
    VUART_RX equ $1001

    ; During init:
          CLR     VUART_TX
          CLR     VUART_RX
          (etc)

    ; Usage
    PUTCHAR:
          TST     VUART_TX
          BNE     PUTCHAR
          STAA    VUART_TX
          RTS

    GETCHAR:
          LDAA    VUART_RX
          BEQ     GETCHAR
          RTS
STOP and WAIT instructions have effects on processor operation that may result in loss of BDM communications. If you use these instructions, here are some tips. For complete information, refer to your target chip's datasheet.
The STOP instruction stops all system clocks in order to reduce power consumption. Since BDM relies on system clock, BDM will not operate when the processor is STOPped. After reset, the S-bit in the Condition Code Register (CCR) is set, disabling STOP mode. In this case, the STOP instruction will be executed as a NOP, no stop will occur, and BDM will continue to operate.
If your application wants to use STOP, it must clear the S-bit in the CCR. During debugging you may wish to omit the clearing of the S-bit so that BDM can be used.
The WAIT instruction stops some system clocks in order to reduce power consumption. Since BDM relies on system clock, BDM will not operate when the processor is in WAIT mode if the clock used by BDM is stopped. After reset, the SYSWAI bit in the CLKSEL register is set. This causes the system clock (and hence BDM) to continue running during WAIT mode.
If your application wants to stop system clocks during WAIT, it must clear the SYSWAI-bit in the CLKSEL register. During debugging you may wish to omit the clearing of the SYSWAI-bit so that BDM can be used.
Whenever you press "OK" in the Target Communications dialog for a P&E pod, NoICE attempts to determine the speed of the target. This may take several seconds. Once the speed has been determined, it is stored in the registry for future use. Normally, this should be transparent to you. However, if you have problems communicating with your target, it may be worth opening the Target Communications dialog, verifying all the settings, and pressing "OK" to get the pod to check communications speed.
The ComPOD PRO will work with targets running at 1, 2, 4, or 8 MHz.
The ComPOD12/NG supports any target frequency in the range 0.25 to 40 MHz.
    LDAA #$08
    STAA COPCTL
    CLR  COPCTL
The standard Play after Reset files do this as:
    EDIT 0x16 0x08
    EDIT 0x16 0x00
Even if you don't use the COP, you may want to add code to set this bit if you use the Real Time Interrupt. Otherwise, the RTI will almost certainly time out while the target is stopped in BDM mode, meaning that the first instruction after GO will usually be the RTI interrupt handler. This may or may not cause problems for you, but the number of non-interrupt instructions executed between RTI interrupts will certainly differ from the free-running case.